December Focus – Home Hazard Hunt
December Focus: Home Hazard Hunt

All of Washington State has the potential of being impacted by a major earthquake. Earthquakes strike suddenly and without warning. When they occur, they cause the ground to undulate and share, perhaps violently. Buildings – and their contents – are vulnerable to this rocking and rolling. Fortunately, experts teach how to secure homes to their foundations and contents to wall studs.
Identifying Potential Home Hazards:
Take 30 minutes to walk through your home. Imagine the ground movement of a significant earthquake. Identify potential hazards using this list:
- Check your water heater
* Is it securely fastened to the wall studs with heavy-duty metal strapping, top and bottom (and not metal plumbers’ tape)?
* Does your water heater have flexible water and gas connectors? - Tall pieces of furniture are especially vulnerable in earthquakes. Identify each bookcase, chine hutch, and armoire which need fastening.
- Identify heavy or breakable objects on high shelves. Pay special attention to objects with sentimental value. Move heavy objects that are located on high shelves to low shelves.
- Identify computers, stereos, televisions, microwaves and other small appliances that need to be secured.
- Identify hanging plants, especially in heavy baskets, and hanging lights near windows.
- Identify mirrors, heavily framed pictures, and framed artwork that needs to be secured to the wall studs. Pay special attention to any of these items over beds.
- Identify kitchen, bedroom, and garage cabinets that need to be secured to keep their contents inside during the ground shaking.
- Check the foundation of your home. Is your home securely fastened to it?
- Does your Chimney have loose bricks and has your attic been reinforced with plywood to help prevent chimney bricks from falling into living areas?
- Identify poisons, toxic chemicals or solvents in breakable containers that are in high or dangerous locations. Should the need ever arise, you and your family can quickly move to your safe room, seal it up and be comfortable until authorities say it is safe to come out. You may also repeat this process at your place of work.
Download and print this Homer Emergency Guide for suggestions on how to secure all these things:
We’re done! We hope you have enjoyed this series and have taken the time to get yourself and your family prepared.
November Focus – Sheltering

There are different types of sheltering that are appropriate for different types of disasters. Regardless of the type of disaster, the first step is to assess the situation and decide whether it is safe to stay or better to change locations.
Shelter in Place
Airborne contaminants may be released into the environment in such quantity and/or proximity to your home or place of work that it is safer to remain indoors rather than to evacuate. In this instance, you would need to Shelter in Place. Sheltering in place is essentially creating a safe room in your home or work by sealing a room. Sealing a room allows you to create a barrier between you and the outside contaminates for a short period of time until the contaminates dissipate and authorities deem it safe to evacuate. The tire fire in 2018 in Shelton is an example of a situation where this was recommended due to the toxic fumes.
- Shut off all fans and adjust the heater and air conditioner to stay off to keep the air from circulating in your home.
- Choose a room in your home that has limited windows and can be sealed tightly. A master bedroom is a great choice because it can accommodate you and your family for several hours. It may even have a bathroom attached, giving you access to running water.
- Purchase and pre-cut plastic sheeting to fit all windows, doors and vents. You can also label each piece to ensure quick application if needed.
- Store your pre-cut sheeting, duct tape, a battery-powered radio (to get alerts to know when it is safe to come out), a flashlight, water and snacks in a bucket or bag in your safe room. For bonus points, add a deck of cards or a game to keep you and your family entertained.
Should the need ever arise, you and your family can quickly move to your safe room, seal it up and be comfortable until authorities say it is safe to come out. You may also repeat this process at your place of work.
If you are in your car, roll up your windows, close your vents and turn off the motor. Breathe through a damped cloth and listen to the radio for more information. If your car does not allow you to listen to the radio with the motor turned off, think about storing a radio in your car along with your kit. It should also be noted that authorities may ask you to stay in your homes or shelter in place for other reasons than airborne contaminants. In these instances, you may just need to go inside, lock the doors and not have to seal a room.
Shelter for Extended Stay:
The length of time required to shelter may be longer than a couple of hours, such as during a winter storm or pandemic. Sheltering for an extended stay means that you would have to stay where you are for several days. In the event of a pandemic, you may be asked to limit your exposure to the outside world for several weeks and stay at home as much as possible. In this case, you would be relying on your emergency kit, the one you have been building throughout the Prepare in a Year series.
Mass Care/Community Shelter:
These are congregated care facilities that house many people in one location. In the event your home is not safe to inhabit following a major disaster, a community shelter may be an option. These types of shelters often provide food, water and basic sanitation needs, however, you should bring your emergency kit with you to ensure you have what you and your family need. Remember to bring supplies for your pets. If a shelter does allow pets, you will be responsible for providing food and care for them. Listen to authorities for where and when shelters will be opened and always cooperate with shelter managers and the volunteers assisting them.
October Focus – Earthquake Preparedness
October Focus: Earthquake Preparedness
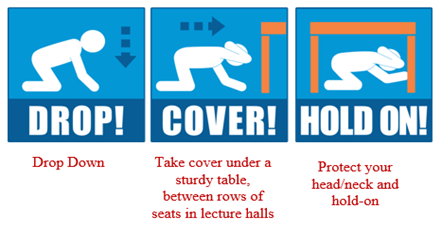
- In a high-rise: Drop, Cover, and Hold On. Stay near interior walls. Do not use elevators. Do not be surprised if the sprinkler system or fire alarms activate.
- In a store: Drop, Cover, and Hold On. Use items in your surroundings to help with protection like shopping carts, clothing racks and the first level of warehouse racks.
- Outdoors: Stay outside. Move to a clear area and Drop, Cover, and Hold On. You are less likely to be hurt by falling objects if you stay away from them.
- Driving: Pull over to the side of the road. Stop and set the parking brake. DO NOT stop under overpasses, bridges, power lines, signs and other hazards. Stay inside your car. If a power line falls on your car, stay inside until it is removed by trained personnel.
- In a stadium or theater: Drop, Cover and Hold On either on the ground in front of your seat or leaning over as much as possible in your seat. When exiting the building, walk out slowly and keep an eye out for things that could fall during aftershocks.
- Near the shore: Drop, Cover and Hold On. When the shaking subsides, do not run, but walk quickly inland or to higher ground for safety in case a tsunami occurs.
What You Should Not Do During an Earthquake
DO NOT run outside or to other rooms during shaking. Being anywhere near an outside building wall is dangerous as these are often the first parts of a building to collapse in an earthquake. Stay inside if you are inside. Stay outside if you are outside.
DO NOT stand in a doorway. Modern houses are no longer built in a way in which door frames are strong enough to withstand the effects of an earthquake. It is safer for you to seek shelter under a table.
After the Shaking Stops
Once the earthquake has stopped, expect aftershocks.
- Be prepared to prevent further injuries by knowing how to extinguish small fires that may have started. Review last month’s post on fire safety for a refresher on how to extinguish small fires.
- Clean up any household chemical spills and inspecting your home for damage.
- Ensure you and your family are safe before assisting others nearby.
September Focus – Utility Management
September Focus: Fire Safety

When it comes to fire, be smart! Below are simple steps to take to keep your home and family safe.
Fire Hazards: Take a few minutes this month to do a fire hazard hunt. Did you know cooking fires are the number one cause of home fires? Start your hazard hunt in the kitchen.
- Keep towels and wooden utensils away from the stove and burners.
- Unplug appliances when they are not in use.
- Never leave your cooking unattended.
- Continue your hunt throughout your house.
- Unplug unused appliances, especially heating equipment.
- Make it a habit of cleaning out the lint trap of your dryer.
- Avoid clutter near your furnace or heater.
- Store all flammable liquids in proper containers and away from any heat source.
Practice: Make a fire escape plan with your whole family! Print off this Home Fire Escape Plan and take a walk through every room in your home. Download a helpful tool here: Escape Plan Grid
- Identify two exits out of every room.
- Check windows to be sure they can open and are not warped shut.
- Keep exits free and clear of any obstructions.
- Teach children how to check a closed door for heat and how to crawl low, under the smoke to escape.
- Identify a meeting location outside of your home where everyone will meet if you must escape.
- Practice, practice, practice!
- When you test your smoke alarms to ensure they are working properly, incorporate a fire escape drill with your whole family.
Smoke Alarms: Smoke alarms save lives! According to the NFPA’s “Smoke Alarms in U.S. Home Fires” report, three of every five home fire deaths result from fires in homes with no smoke alarms. Install smoke alarms in every bedroom, outside of sleeping areas and at one on every level of your home. It is important that you keep doors closed to slow down the spread of smoke and fire. Test smoke alarms every month to know they are working properly. Replace smoke alarms at least every 10 years.
You will typically find two types of smoke alarms at the store. Ionization alarms, which are best at detecting fast-flaming fires and photoelectric alarms, which are best at detecting slow-smoldering fires. You can also find dual-sensor alarms which combine both methods into one unit.
A hard-wired smoke alarm system is preferred. The alarms are wired into your home’s electrical system and if one alarm detects smoke, all alarms in the home go off simultaneously to alert you and your loved ones.
People who are deaf or hard of hearing should have alarms with strobe lights or vibration notification installed.
Escape Ladders: Consider purchasing a fire escape ladder if you live in a two- or three-story building. Should you have to escape through a window, a fire escape ladder will ensure that you and your loved ones can escape safely and easily.
For a two-story home, the ladder should be between 10-15 feet and for a three-story home, it should be 20-25 feet. Store your ladder(s) near bedroom windows. Be sure everyone in the household knows where they are located and how to use them (read manufacturer’s instructions.
Extinguishers: Fire extinguishers can be helpful in putting out small, contained fires, like the size of a waste bin. Remember, fire can double in size every minute! You should only consider using an extinguisher after you have called 911 and after all members of your home have been alerted.
When purchasing a fire extinguisher, be sure it has a UL label. An A-B-C fire extinguisher is great for your home because it will put out ordinary combustibles such as wood or paper (Class A), flammable liquids like grease and oil (Class B), and electrical energized fires (Class C). Make sure you are physically able to handle an extinguisher, it takes two hands to hold and operate it at the same time. Store your extinguisher in an easily handy area.
To put out a small fire with a fire extinguisher, always have your back to your exit and remember PASS!
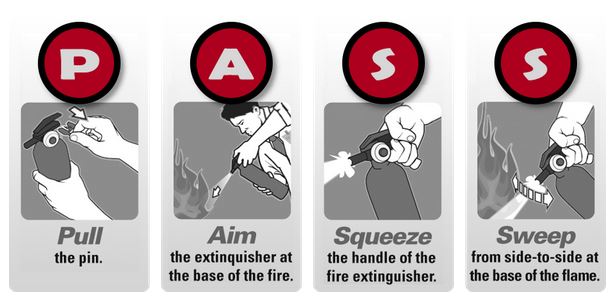
A standard UL rated 2A:10BC fire extinguisher will only last 13-15 seconds, if you cannot suppress the fire in that amount of time, it is time to evacuate!
August Focus – Fire Safety
August Focus: Utility Management
With the nice weather, it is a great time to get outside and become familiar with the location of your gas meter. Knowing the location of your gas meter and how to turn it off is essential, should you smell natural gas or suspect a leak. For those with propane tanks be sure you familiarize yourself with how to turn it off as well.
Signs of a gas leak include:
- Bubbles rising in a puddle or other pool of liquid
- Dust or dirt blowing from a hole in the ground
- Dead or dying vegetation in unexpected locations
- Hissing (small perforation) or roaring (large break)
If you smell natural gas (“rotten eggs”):
- Immediately evacuate the building. DO NOT use anything which may create a sparking, or igniting source, such as ringing a doorbell or using light switches. Open windows and doors as you leave, if possible, to allow for ventilation.
- Call your natural gas service provider or 911 a safe distance from the leak.
- Turn off your gas meter. Keep a crescent wrench at least 12 inches in length in an accessible and known location. You can attach the wrench to the meter or on the wall directly behind the meter. If keeping the wrench by the meter, adjust to fit the valve ahead of time, it will be ready to use in case it rusts in position.
How to turn off your gas meter:
- Locate the main shutoff valve. It’s usually on the first fitting of the pipe coming out of the ground next to the meter.
- Use a non-sparking tool to turn the lever 45 degrees so it is crosswise to the pipe.
DO NOT turn your gas meter back on once you have turned it off. Your gas company MUST turn the meter back on. This allows them to check the system to make sure it is safe to turn it back on and to relight appliances for use.
Electrical Safety
- Know the location of your electrical panel.
- Do not place items in front of the electrical panel to hide it. This makes it difficult for those in your family and first responders to find it, should they need to access it in an emergency.
- Label each individual breaker in the electrical panel and post shutoff instructions. This allows quick access to turn off power to an item in case of an emergency, such as turning off power to the source of an electrical fire.
- If you must turn power off to the entire house, it is best to turn individual breakers off starting from the bottom and working to the top, then turning your main breaker off. However, in an emergency you can turn off the main breaker to turn off power to the entire house.
- You can turn on your main breaker once it has been deemed safe to do so. MAKE SURE ALL the individuals breakers are OFF BEFORE turning the main breaker back on. Having the individual breakers on when turning the main breaker on can cause a huge power surge, which can start a fire.
Water
- Locate and label the water main to your house for easy identification by others.
- Know how to turn off the water main so you can do this in an emergency or disaster. Turn the valve right to turn off. This will require a special valve wrench available from a hardware store. Turning the water off in a disaster will prevent contaminated water from entering your water heater and plumbing. (see our March post for more information on this topic)
Spend time this month with your family locating your gas meter, propane shut-off, electrical panel and water main to the house. Include these locations in your written family emergency plan. Make sure your family members know how to turn off each of these utilities should the need arise in an emergency or disaster situation.
July Focus – Under the Bed Items
July Focus: Under the Bed Items

Disasters usually strike when you least expect them. Earthquakes and natural disasters do not wait for everyone to wake up in the morning; they can just as easily occur in the middle of the night. Imagine you have just been woken up because your bed is shaking and items are crashing all around you in the dark. You are dazed, confused and half-asleep. What do you do? Do you jump out of bed, potentially stepping on broken glass and tripping on hazards as you race out of your bedroom? Or do reach for your “under-the-bed emergency kit,” to check on your family safely and get out of your home if necessary?
Critical under-the-bed items:
- Sturdy shoes – an old pair of athletic shoes or boots that you can slip on quickly to protect your bare feet from broken glass and other hazards.
- Work gloves – preferably leather, but any type that you have around the house that will protect your hands from broken glass and other hazards.
- Flashlight or light sticks – seeing in the dark is critical for a nighttime response. Be sure to check batteries regularly.
Bonus items:
- Hardhat
- Sweater
- Radio
- Water
- Bandages
Place gloves in one shoe and the flashlight in the other. Slide under your bed where you able be able to reach them in the middle of the night. Make “under the bed kits” for every family member.
One concern is that children will grow out of their shoes and yes, they will. Replace as needed or you can buy inexpensive tennis shoes for this purpose. They do not have to be the latest and greatest, they just need to protect your children’s feet. Make it clear how important those items are to keep safe and they are only to be used in emergencies.
June Focus – An Extended Event
June Focus: An Extended Event
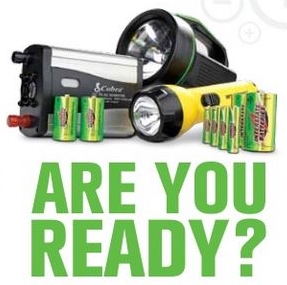
Summer is almost here! Days of extended sunshine mean it is time to enjoy the great outdoors. It’s also a perfect time to gather items to be ready for two weeks and beyond!
Following a major disaster, restoration of power and utilities can take days, weeks or even months. Preparing now will help when that time comes. Think of it as an extended camping trip. You will need equipment to provide light and heat for cooking and comfort, and items for sleeping, staying dry and sanitation. Gather and store these items in one location in your home. If you use two five-gallon buckets, these buckets can be used as emergency toilets when emptied of supplies; one for liquid and the other for solid waste. Below is a list of items to consider getting for an extended stay:
• Lighting
- Flashlights/batteries, camping lanterns, light sticks
• Cooking
- Camp stoves, sterno stoves and barbecues. Store extra charcoal, propane, etc. Do not forget a lighting source! (Never burn charcoal indoors or use propane or any type of gas portable stoves or BBq’s indoors – this could cause carbon monoxide poisoning).
- Eating utensils/bowls/plates/cup, paper towels. If you use disposable items, you will not have to worry about using your precious water to clean dishes.
• Shelter
- Tent or tarps, rope, sleeping bags, blankets, pillows, rain gear.
• Hygiene
- Bleach, washcloths and towels, soap, hand sanitizer, gloves, feminine hygiene products, toothpaste, toothbrushes, shampoo, disposable razors, comb.
- Toilet paper, toilet seat or lid that fits on a 5-gallon bucket, plastic bags and twist ties for waste disposal, cat litter, small shovel.
Make sure you also add to your water supply and stock up on food, canned or dried. Don’t forget your pets!
This month can add up if supplies must be purchased. Shop around your home first and put items you already have in one location. Check out outlets, dollar stores, and clearance sections for good deals as well. Don’t worry, next month’s task won’t cost a penny!
May Focus – Important Documents
May Focus: Important Documents

Documents that prove identity, health, and finances are often not thought of as essential items in a disaster preparedness kit. However, these documents are critical in trying to return to normal following a disaster. Having quick access to important documents helped residents who evacuated their homes in the wake of Hurricane Katrina to be able to quickly and easily register for benefits and take advantage of insurance coverage for mortgage payments while they were homeless.
Family Documents: The ability to prove your identity is one of the single most important things anyone should be able to do following a disaster. Not having proper identification can delay necessary assistance for an undetermined about of time. Having the following documents at hand can ease this burden:
• Driver’s licenses/Passports
• Social Security Cards
• Citizenship papers
• Birth certificates/Adoption papers
• Marriage license/divorce decrees/child custody papers
• Current military ID/military discharge
Medical Information: If you need medical attention following an emergency or disaster, it is not likely that your regular doctor will be taking care of your needs. You also may not be able to communicate your medical history to those caring for you. Ensuring you have the following information for you and your family will assist those caring for you, if required:
• Immunization records
• Prescription information (drug name and dosage)
• Pertinent medical history such as medication allergies, surgeries, and medical conditions
• Health insurance identification cards
• Physician names and phone numbers
• Powers-of-attorney for health care and living will(s).
Financial Documents: In order to obtain money from your bank accounts or credit cards you will need to have proof of your finances with that institution. Keeping copies of the following documents in your disaster preparedness kit will help:
- A copy of last year’s tax return. This will assist in proving your income should you need to do so.
- Account numbers for all your bank accounts. Copies of your credit and debit card statements are also helpful to have so you can access your money following a disaster.
- Copies of all investments, including stock and bond certificates and retirement accounts. Insurance policies: including homeowners, renters, auto, life, health, disability, long-term care, flood, and earthquake insurance. At a minimum, you should have the name of the insurance company, contact information and your policy number for each of your insurance policies.
- Estate planning documents: wills, trusts, funeral instructions, powers-of-attorney, attorney names and phone numbers.
- Property records: Real estate deeds of trust and mortgage documents (at least the two-page settlement statement provided by the title company showing the actual cost of the house and purchase expenses); rental agreement or lease; auto/boat/RV registration and titles; video, photos or a list of household inventory.
- Photos or video of all valuable to be able to document insurance claims.
Don’t forget your pets: Pet medical and vaccination records, current photos and microchip numbers can help ensure you are reunited with your pet following a disaster.
Storage: Make copies of documents or have them scanned and saved in electronic format. Keep them in a sealed, waterproof pouch in your emergency kit or in a small fireproof and waterproof safe that you can easily take with you in the event of an emergency.
Storing documents in an off-site location, like a security deposit box is also an option. However, access to these documents may be delayed following a disaster.
Ready access to important documentation will ease the burden of obtaining assistance and resuming a sense of normalcy following a disaster. The cost of collecting and storing these documents depends primarily on your method of storage, which can be adjusted to fit within your budget. There are lots of options. I purchased a document bag on Amazon for around $17.00.
April Focus – Create a 3-Day Kit
April Focus: Create a 3-Day Kit

So far this year, the Prepare in a Year series has covered creating an emergency plan, establishing an out-of-area contact and storing enough water for an entire family. The ultimate goal is to be ready for two full weeks, but for now April is dedicated to assembling enough supplies to sustain a family for three days.
During a disaster it is possible to have to leave in a moment’s notice. Having supplies pre-assembled to keep a family safe and comfortable is vital. A three-day kit is not going to include every item possibly needed during an emergency. Be sure to make your kit manageable. It is not required to go out and buy all new supplies either! Shop your home first to assess what you need, then make a list of items to gather throughout the year. Preparing for disasters is a long-term goal.
Start with a storage container, which needs to be portable enough to grab and go. A backpack is great; family members can customize one to meet their needs. A backpack has limited space, so be sure to add only the essentials.
Water: As discussed in March, one gallon per person per day is recommended, but can become very heavy to carry. Think about storing your water near your kit and adding 12-ounce water bottles to your pack. A water filtration system is another option but will be an additional cost.
Food: Add items that do not require water or cooking. Non-perishable canned food that are ready to eat such as meats, vegetables and fruits are ideal (remember to add a can opener). Canned food will add weight to your pack so balance with high protein dry goods like granola and protein bars. “Comfort” foods like cookies and hard candies will add a sense of normalcy during a stressful time. Add utensils and pay attention to serving sizes and calories. Remember, these are survival items; you will not get to eat until you are stuffed! Also, do not forget your pets and their needs!
First Aid Supplies: In addition to the standard first aid items (bandages, tape, antiseptic, antibiotic cream, scissors, tweezers, non-latex gloves, aspirin and non-aspirin medication), add items to address your family’s specific needs such as: medications, sanitary pads or eyeglasses. Other items that will be useful (if space allows) are needle and thread, sunscreen, safety pins, insect repellent, instant cold packs and plastic bags. The Red Cross site has a great list: https://www.redcross.org/get-help/how-to-prepare-for-emergencies/anatomy-of-a-first-aid-kit.html
Tools & Supplies: Having a flashlight with extra batteries is essential. A headlamp to be hands free is even better! Add a battery-operated or hand crank radio, preferably a NOAA Weather radio so you can receive verified emergency information. Other supplies to add to your three-day kit are pocketknife, duct tape, lighter, whistle, toilet paper and other hygiene items and pet supplies. Add at least one complete change of clothing (consider layers for inclement weather). If space allows, add games and books for entertainment.
Documents: Include your emergency plan! Other important documents include copies of insurance policies, inventories, account information, family records and photos and local maps. May’s Prepare in a Year post will cover documentation in more depth, so stay tuned!
March Focus – Water Storage
March Focus: Water Storage

Clean water is essential for life, both for hydration and to prevent the spread of disease. Healthcare providers who assisted with disaster efforts in Puerto Rico treated multiple conditions related to contaminated water, including vomiting, diarrhea, pink eye and leptospirosis. Clean water storage is a top priority in disaster preparedness. This month GCA will assist members in learning about water storage preparation.
Each person in a household requires one gallon of water per day for drinking and sanitation. FEMA recommends storing enough water for each member of a household for two weeks. While specialized barrels to store large amounts of water and tools to maintain water purity are available, it is not the only method in which you can store water.
Water can be stored in screw-top plastic bottles, such as a two-liter soda bottle, which are less likely to break or leak. Look for the triangular recycling symbol with a number “1”, as those are the best for water storage. Plastic milk and juice containers are not recommended, as they are difficult to sanitize, and their plastic can become fragile and brittle over time. To sanitize a two-liter soda bottle, rinse it out with one teaspoon on non-chlorine bleach and one quart of water. Then fill the bottle with clean water and screw the lid on tightly. Label the bottle “drinking water”, put a date on it and store it in a cool, dark place. Empty, sanitize, and refill the bottle every six months to ensure the water remains clean. Bottled water may also be purchased and used for storage. While the FDA does not require expiration dates to be printed on bottled water, it is recommended it be consumed within a two-year period. Once the bottled water has been opened, there is the potential for bacteria and algae to develop.
Using water of questionable purity: It may be necessary to use water of questionable purity. This includes rainwater, water from streams, rivers, creeks, ponds, lakes, and potentially flood water. These sources of water can contain various contaminates that could cause illness. Before using water from these sources, it will be necessary to sanitize this water.
The first step in sanitizing water will be to filter out as many solids as possible. This can be done using coffee filters, several layers of paper towels, or a clean cloth. Portable water filters can also be used. If purchasing a portable water filter, choose one with a filter pore size small enough to remove both bacteria and parasites. Most portable water filters do not remove viruses. Carefully read and follow the manufacturer’s instructions for the water filter intended to be used.
Sanitizing water by boiling: After filtering the water, bring water to a rolling boil for one minute and allow it to cool naturally. Boiling water is the surest method to kill many disease-causing organisms, including viruses, bacteria and parasites.
Sanitizing water by using bleach: For each gallon of filtered water, add eight drops of unscented chlorine bleach and allow it to stand for 30 minutes. If the faint scent of bleach is present after 30 minutes, the water is good to use. If bleach is not detected, add eight more drops of bleach and let it stand for another 15-30 minutes. If a faint scent of bleach is still not detected, the water cannot be used for drinking. .
Boiling water and using bleach will kill most viruses and bacteria but it will not remove metals, salts or chemicals, so the water may still have a funny taste. The taste may be improved by pouring it from one container to another and allowing it to stand for a few hours or by adding a pinch of salt for each quart of water. Plan for how to boil water if there were no power.
Hidden sources of water in your home: Turning off the main water valve does two things: It prevents contaminated water from entering the lines in a home, and it keeps gravity from draining water out of the home’s lines if there is a break in an outside pipe. To turn off the water, locate the main shut-off valve and turn the knob or handle clockwise until it is completely closed. A wrench may be needed to do this. Some older homes may also have a shut-off inside, located in the basement or garage. Water heaters can provide several gallons of drinking water obtained by following these steps:
- Determine whether it is an electric or gas-powered water heater. This will determine how to turn off the source that makes the water hot. If it is electric, turn off the circuit breaker for the water heater. If it is gas, close the gas valve.
- Turn off the water intake valve.
- Attach a short hose to the valve at the bottom of the tank to assist with draining. A three-foot length garden hose or washing machine supple hose can be used.
- Turn on a hot water faucet in the house to let air into the system.
- Drain water from the hot water heater. Hearing a sucking sound in the pipes is likely to occur. Sediment will also likely be in the water that is drained. Use the methods described earlier to clear the water of sediments after allowing them to settle to the bottom of the water.
- Refill the tank before turning the electricity or gas back on. REMEMBER, a professional MUST turn the gas back on after it has been turned it off for safety reasons.
Tip: Be sure you protect this water source by securing your water heater to the wall studs.
Water standing in the pipes of a house is also available for use. To collect this water, turn on a faucet at the highest level of the home to allow air in the lines. A small amount of water will trickle out. Water can then be collected from a faucet at the lowest level of the home. Water can also be obtained by melting ice cubes, from canned fruit and vegetable liquids, and from toilet tanks, if toilet cleansers have not been placed in them.
Unsafe Water Sources:
- Radiators & Toilet bowls
- Hot water boilers (part of a home heating and not drinking water system)
- Water beds (fungicides in the water and chemicals in the vinyl case make it unsafe)
- Swimming pools or spas (due to the chemicals added)
- Any water that has an unusual odor or color, or that you know, or suspect might be contaminated with fuel or toxic chemicals. Water contaminated with fuel or toxic chemicals CANNOT be made safe for drinking by boiling or disinfection.
February Focus – Identify an Out-of-Area Contact
February Focus: Identify an Out-of-Area Contact
When disaster strikes, you may be at home, work, school or on the road and not with all the members of your household. Your first thoughts, though, will be with your loved ones and their well-being. After a disaster, local phone lines may not work due to the number of people trying to make local calls or the number of phones knocked off the hook which can affect local phone service. The importance of texting and the use of social media was discussed in January’s post, as well as the crucial need to have an out-of-area contact.
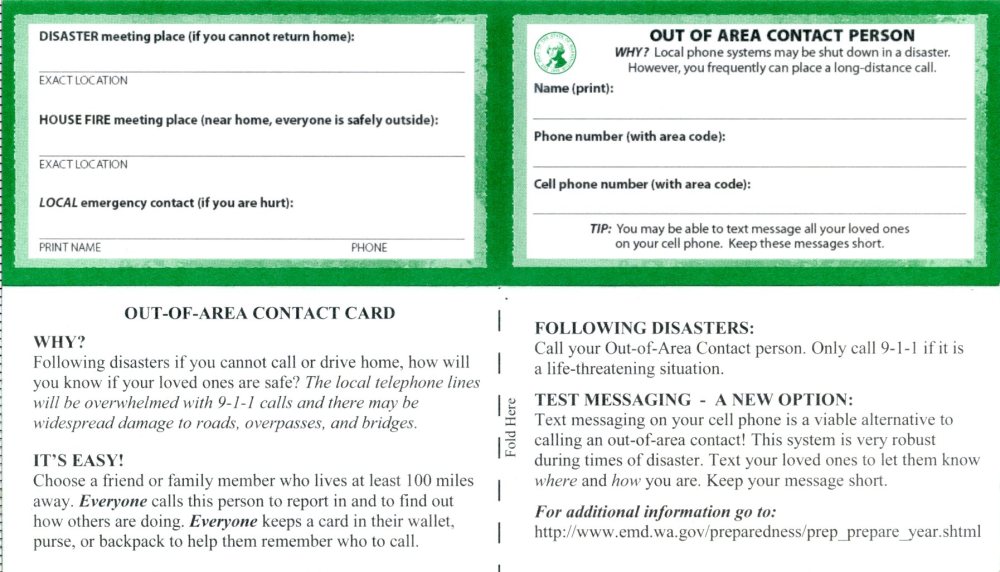
An out-of-area contact is someone who lives at least 100 miles away from you, as long-distance phone calls are more likely to go through. This person will be the one who all family members contact to inform of their location and how they are doing. This limits the potential of having several people trying to make several phone calls that are unlikely to go through.
Make sure that your out-of-area contact knows you have designated them with this task and that all the other members of your family know how to contact them. Let your out-of-area contact also know the name of all the people you want contacted and informed of your situation. Practice is important! Conduct a communication drill to ensure your plan and all methods of communication are working. Information that your out-of-area contact should collect:
- Who called
- The time they called
- Their current status. If they are injured, how are they injured?
- Their current location and if they intend on relocating
- When will they call back again to provide an update if needed
Put your out-of-area contact on a card that each member of your household always carries in their purse, wallet or backpack. This eliminates the need to remember this information at a time when millions of other things will be running through your mind. Print out and make copies of the card below (click link to print) for all family members. Fold over to fit in wallet.
OUT OF AREA CONTACT CARDS:
In March, the focus will be on “Water Storage”.
January Focus – Make a Plan
January: Make your Plan
The task for the month of January is to create your emergency action plan. What is the importance of having a plan? The fact that developing and practicing an emergency action plan can save countless lives throughout the community during an emergency or disaster.
STAY INFORMED: The first step in developing your emergency action plan is to become aware of what potential emergency or disasters can occur in your area, such as earthquakes, power outages, train derailments and volcanoes. One way to stay informed is to sign up for Mason County Alerts. This is a free service which sends notifications about emergencies occurring in your area and other important community news. Alerts include information on severe weather, flooding, unexpected road closures, missing persons and evacuations of buildings or neighborhoods. You can receive these alerts in the manner most convenient for you, whether that be at your home, business, via text messages or email, or all of the above. This tool will help keep you informed with vetted and reliable information in addition to any information you hear on the radio, television or social media. Sign up for Mason County Alerts with this link – it only takes a minute:
http://public.alertsense.com/SignUp/public.aspx?regionid=1187
FOCUS ON FAMILY: The second step in developing your emergency action plan is to determine the specific needs of those in your household. This will enable you to prepare and accommodate for any special needs that are required. These needs may include having enough diapers and formula available for infants, or having food, leashes, kennels for pets, and any necessary accommodations for disabled family members or those who require specific medications or medical care.
DEVELOP YOUR PLAN: Now that you have collected this information, you are ready to develop your emergency action plan. Review the layout of your house and determine two ways to exit each room in the event of an emergency. You will also need to pick two meeting locations outside of your home. The first location should be close to your house, such as by the mailbox or the large tree across the street. The second location should be outside of your neighborhood in case it is not safe to be near your home.
We have put an emergency plan template on the GCA website to make this easier for you. Download the template and get started! Emergency Plan Template
So far, no money has been spent on your “Prepare in a Year” plan. Be sure to develop and practice your plan with each member of your household. Knowledge and practice help muscle memory engage during an emergency or disaster when denial, panic or paralysis can set in. You can download the “Prepare in a Year” document from this link: Download the Brochure
In February, the focus will be on “Designating an out-of-area contact”.
Disaster Preparedness: Our CERT Training Recap
Disaster Preparedness: Our CERT Training Recap
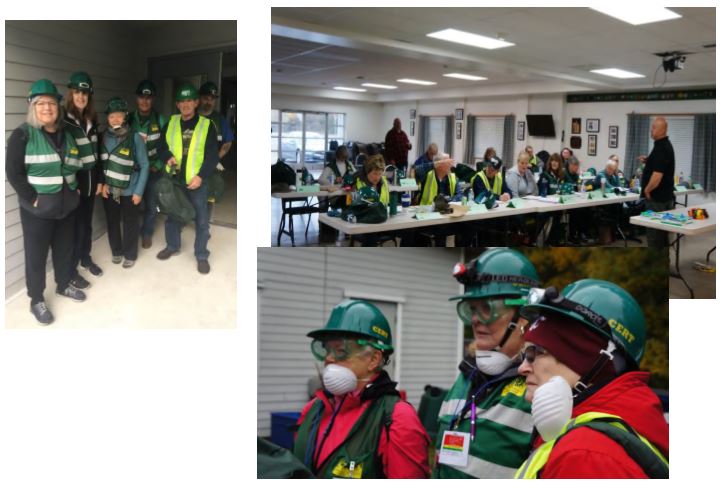
Eighteen local residents participated in a 20-hour Community Emergency Response Team (CERT) disaster preparedness training sponsored by Mason County Department of Emergency Management. The training was held at the Horton Community Center across two weekends: October 26 & 27 and November 2 & 3rd.
Through classroom sessions and “hands-on” exercises, CERT members are trained to assist those in their neighborhood and/or workplace following a disaster, at a time when professional emergency responders may not be immediately available. The participants learned CERT organization and psychology, disaster preparedness, light search and rescue techniques, fire safety and how to provide basic medical assistance.
Upon completion of the CERT Program, members have the option of being assigned to teams based on their residential or workplace locations. “If an emergency occurs, we need to be prepared to take care of our families and neighbors before the real first responders can get here – which may take a very long time,” said participant and Grapeview resident Mike Blaisdell. “This training is a great way to help people feel more comfortable and helps them know what to do to keep their families safe and prepared,” he said.
The CERT course will benefit any citizen who takes it. The training will better prepare you to respond to and cope with the aftermath of a disaster. Additionally, if our community wants to supplement its response capability after a disaster, residents can be recruited and trained as neighborhood teams that, in essence, will be auxiliary responders. These groups can provide immediate assistance to victims in their area, organize spontaneous volunteers who have not had the training, and collect disaster intelligence that will assist professional responders with prioritization and allocation of resources following a disaster.
If you are interested in participating in a CERT course, please email Leslie Blaisdell at websitegca@gmail.com. We’d like to set up another local session in 2019!
Why CERT?
“CERT is about readiness, people helping people, rescuer safety and doing the greatest good for the greatest number. It is a realistic approach to disaster situations where the actions of average citizens can make a positive difference. Regardless of personal limitations, there is a role for everyone in CERT”.
In the event of a major emergency or disaster, many of the resources normally available to those of us who live and work in Western Washington State may become inaccessible and unavailable. Public services may be interrupted; communications, utilities, and commodity delivery systems (food, water, and medicines) could be disrupted. Most importantly, if a major disaster occurs, the fire department, paramedics, and police…WILL NOT COME! They will be deployed FIRST to major incidents such as collapsed buildings. That is why you constantly hear that “You MUST be prepared to take care of yourself.”
What is CERT? The Community Emergency Response Team (CERT) program is an all-risk, all-hazard training. This valuable course is designed to help you protect yourself, your family, your neighbors and your neighborhood in an emergency. If a major earthquake (or any disaster) hits, do you …
- have enough supplies for a minimum of 72 hours up to an entire month for all family members, including pets?
- know how to turn off the gas?
- know how to safely turn off the power?
- know how to apply first aid?
- have enough water for your family and your pets?
- have provisions for living outside your home for a length of time if the structure is compromised?
Being aware of the hazards in our area will help you understand the importance of everyone being able to provide for their own personal needs for at least seventy-two hours and possibly much longer. CERT classes teach community volunteers important and valuable emergency response skills and actions that will help safeguard and protect themselves, family members, neighbors and coworkers.
When you are trained, you are far more equipped to deal with your circumstances without needing aid from outside sources. CERT members are trained in basic disaster response skills such as fire safety, light search and rescue, team organization and disaster medical operations. You will learn how to prepare for emergencies; what supplies you should NOW have in your house, how much food, how much water but most importantly, how to protect your family in an emergency!
CERT Participants Learn How To:
- Identify and anticipate hazards
- Extinguish small fires
- Recognize and treat life-threatening conditions
- Triage patient care activities
- Conduct light search and rescue
- Help reduce survivor and team stress
- Organize emergency response volunteers
- Identify and respond to threats of terrorism
- Assist first-responders by recording and reporting situation information
- Preparing disaster supply kits
Click on the “BARS” above to learn more about each monthly plan!
Disaster Preparedness Series
Disasters can happen anytime and anywhere, so are you prepared? The consequences of a disaster are largely preventable. One hour of “Disaster Preparedness Activity” each month will help you be ready for disasters – wherever they occur and whatever they are.
One of GCA’s goals for 2019 is to help our members to “Prepare in a Year”. As with any goal, preparing for a disaster can seem like a monumental task. The goal is to be easy and as inexpensive as possible. Each month, we will focus on one aspect of disaster preparedness and assist you in one hour of disaster preparedness activity.
January – Make a Plan
February – Out of Area Contacts
March – Water Storage
April – 72-hour Comfort Kit
May – Important Documents
June – Extended Events
July – Under the Bed
August – Utility Safety
September – Fire Safety
October – Drop, Cover and Hold
November – Shelter in Place
December – Home Hazard Hunt
To learn more about “Prepare in a Year” and go to this link: Download the Brochure
See also:
